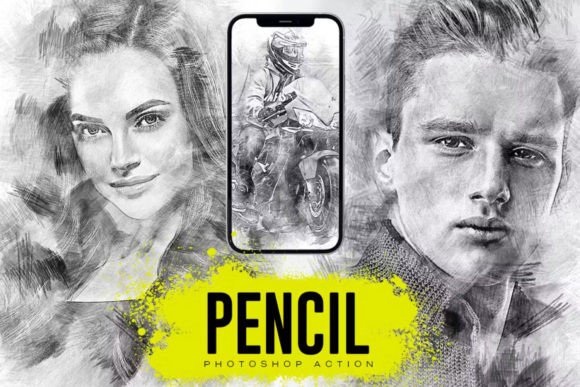
Pencil Photoshop Action: Transforming Photos into Artistic Drawings
In the realm of digital design and creative photography, the ability to quickly transition between realistic imagery and stylized illustrations is a valuable skill. The Pencil Photoshop Action serves as a powerful bridge between these two worlds, allowing users to convert standard photographs into convincing pencil sketches with minimal effort. This tool is not merely a filter; it is a structured workflow automation designed to streamline the artistic process for professionals, hobbyists, and entrepreneurs alike. By leveraging this action, creators can produce high-quality visual assets that fit seamlessly into marketing materials, personal projects, or educational content without requiring advanced manual drawing skills.
Understanding the Role of Automated Actions in Creative Workflows
For many adults balancing professional responsibilities with creative pursuits, time is the most scarce resource. Manual retouching or hand-drawing over a photograph can be incredibly time-consuming. A Pencil Photoshop Action addresses this by encapsulating complex layer operations, blending modes, and brush settings into a single executable sequence. When you install the action file (typically an .ATN file), you are essentially downloading a pre-programmed set of instructions that tells Photoshop exactly how to manipulate pixels to mimic graphite on paper.
This automation fits into the broader creative process at various stages. It can be used during the initial concept phase to visualize how a product might look as a sketch in a brochure. It can serve as a post-production step for photographers looking to offer clients alternative artistic versions of their portraits. For marketers, it provides a quick way to generate unique social media graphics that stand out from standard stock photos. The efficiency gained here allows teams to focus more on strategy and composition rather than getting bogged down in tedious technical execution.
Technical Requirements and Preparation
Before integrating this tool into your routine, ensuring your environment is correctly configured is essential for success. Unlike some universal plugins, this specific action relies on precise color modes and bit depths to function correctly. You must ensure your document is set to RGB Mode and 8 Bits per channel. If your image is in CMYK or 16-bit mode, the action may fail or produce unexpected results because the mathematical calculations for the pencil texture rely on the standard RGB 8-bit structure.
Furthermore, compatibility is a key factor. This action is designed to work with Adobe Photoshop versions CS6 and CC. While newer versions of Photoshop generally maintain backward compatibility with older actions, users should verify they are running the English version of the software. Many actions depend on specific layer names written in English; if your interface is localized to another language, the action script may not find the necessary layers to execute the steps, causing the process to stop prematurely.
The package typically includes several distinct components that work in tandem:
- Action File (.ATN): The core script that executes the transformation.
- Brushes (.ABR): Custom brush presets used to create the texture and stroke details of the pencil effect.
- Patterns (.PAT): Textural patterns that simulate the grain of paper or the density of graphite shading.
- Instructions (.txt): A text file containing setup guides and troubleshooting tips.
- Video Tutorial: A visual guide demonstrating the installation and usage process.
Installation and Initial Setup
Getting started requires a straightforward installation process. Once you have downloaded the files, open Photoshop and navigate to the "Actions" panel. Load the .ATN file by clicking the menu icon in the top right corner of the panel and selecting "Load Actions." Repeat a similar process for the brushes and patterns via the Brush Preset Picker and Pattern Picker menus respectively. It is crucial to load all supporting assets before running the main action, as the script will attempt to call upon these specific brushes and patterns during execution.
After installation, the action appears in your list ready to be triggered. The beauty of this system lies in its simplicity. You do not need to manually adjust sliders or select specific tools. However, preparation of your source image matters. While the action works with people, animals, buildings, and objects, high-contrast images often yield the best results. Ensure your photo has clear edges and good lighting before applying the effect. Blurry or low-resolution images may result in a muddy output where the pencil strokes lose definition.
Executing the Transformation Process
Once your image is prepared and the action is loaded, the actual transformation is instantaneous. Select your photo layer and click the "Play" button next to the Pencil Photoshop Action in the Actions panel. Within seconds, the software processes the image through a series of hidden steps. The action creates new layers, applies the custom brushes to define the lines, and overlays the paper texture patterns to give depth and realism.
What makes this tool particularly effective for non-artists is the organization of the resulting file. Upon completion, you will find a well-organized folder structure within your Layers panel. These folders contain adjustable layers, meaning the effect is not "baked in" permanently. This non-destructive approach is vital for professional workflows. If the final result is too dark, you can adjust the opacity of the shading layer. If the lines are too thick, you can modify the brush intensity. This flexibility ensures that you retain full control over the final aesthetic without having to restart the entire process.
Integrating Pencil Effects into Business and Personal Projects
The versatility of the Pencil Photoshop Action extends beyond simple experimentation. In a business context, this effect can be used to create mockups for architectural plans, turning raw renderings into hand-drawn style blueprints that feel more approachable to clients. For educators, transforming historical photos into pencil sketches can add a vintage, textbook-like quality to course materials. Entrepreneurs selling digital products can use these sketches to create packaging designs that evoke a sense of craftsmanship and authenticity.
Consider a scenario where a photographer offers a wedding portfolio. Instead of just providing standard color prints, they can include a selection of pencil-sketch versions of the couple's portraits. This adds variety to the collection and offers a unique keepsake. Similarly, bloggers and content creators can use these images to break up walls of text, using the monochromatic nature of pencil drawings to provide visual relief while maintaining a cohesive theme.
Workflow Optimization Tips
To maximize efficiency, consider batching your processing. If you have multiple images that require the same treatment, you can record a secondary action that opens a folder of images, applies the Pencil Photoshop Action to each, and saves them automatically. This leverages Photoshop's batch processing capabilities, allowing you to handle large volumes of content in a fraction of the time.
Additionally, always keep a backup of your original image. Even though the action uses adjustable layers, working on a copy ensures your source material remains pristine for other potential edits. It is also advisable to test the action on a few sample images before committing to a large project. This helps you understand how different subjects—such as fur on animals versus the smooth surfaces of buildings—react to the algorithm, allowing you to make minor adjustments to the source image beforehand if necessary.
Quality Control and Long-Term Usability
Maintaining consistency across a series of images is critical for professional output. Because the Pencil Photoshop Action uses predefined parameters, every image processed will share a similar stylistic DNA. This consistency is beneficial for branding and series-based work. However, it is important to review each output individually. Lighting conditions in the source photo can sometimes cause the action to interpret shadows differently, leading to variations in line weight. Minor manual tweaks to the adjustment layers created by the action can harmonize these differences.
Long-term usability depends on keeping your asset library organized. Store the .ATN, .ABR, and .PAT files in a dedicated folder on your hard drive or cloud storage. Over time, as you update your software or move to new computers, having these files readily available ensures you can replicate your workflow anywhere. The included instruction text and video tutorial serve as excellent references for refreshing your memory on the specific requirements, such as the RGB mode constraint, which is easily forgotten after months of use.
Conclusion on Practical Implementation
The Pencil Photoshop Action represents a practical solution for those seeking to blend photography with illustration without the steep learning curve of traditional art techniques. By automating the complex interactions between brushes, patterns, and layer blending, it empowers users to focus on the creative outcome rather than the technical mechanics. Whether you are a freelancer delivering client work, a marketer designing campaign assets, or a hobbyist exploring digital art, this tool integrates smoothly into existing workflows. Its non-destructive nature, combined with broad compatibility across subject matter, makes it a reliable asset for generating high-quality, artistic visuals efficiently. With proper preparation and attention to the technical requirements, anyone can achieve professional-grade pencil drawings effortlessly.